Danke für die Antworten.
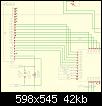
Hier mal mein code/beschaltung.
Kontakte hab ich alle durchgetestet.
Code:
#define DATA_PORT PORTA
#define LCD_RS IOPORT_CREATE_PIN(PORTB,2)
#define LCD_E  IOPORT_CREATE_PIN(PORTB,0)
#define LCD_RW IOPORT_CREATE_PIN(PORTB,1)
#define P_DB0 IOPORT_CREATE_PIN(PORTA,0)
#define P_DB1 IOPORT_CREATE_PIN(PORTA,1)
#define P_DB2 IOPORT_CREATE_PIN(PORTA,2)
#define P_DB3 IOPORT_CREATE_PIN(PORTA,3)
#define P_DB4 IOPORT_CREATE_PIN(PORTA,4)
#define P_DB5 IOPORT_CREATE_PIN(PORTA,5)
#define P_DB6 IOPORT_CREATE_PIN(PORTA,6)
#define P_DB7 IOPORT_CREATE_PIN(PORTA,7)

void lcd_set_write_instruction();
void lcd_set_write_data();
void lcd_write_byte (char c);
void lcd_clear_and_home();
void lcd_home();
void lcd_goto(uint8_t line, uint8_t pos);
void lcd_line_one();
void lcd_line_two();
void lcd_write_data(char c);
void lcd_write_string(char *x, uint8_t len );
void lcd_write_string_0(char *x);
void lcd_write_string_p(const char *s);
void lcd_init();
void lcd_set_on_off(uint8_t state);
void lcd_write_inst(uint8_t cmd);


//this function is directly called from main
//it init the display and trys to print some test chars. The result is only a blinking cursor that moves
void lcd_init()
{

		ioport_configure_pin(LCD_E, IOPORT_INIT_LOW | IOPORT_DIR_OUTPUT);
		ioport_configure_pin(LCD_RS, IOPORT_INIT_LOW | IOPORT_DIR_OUTPUT);
		ioport_configure_pin(LCD_RW, IOPORT_INIT_LOW | IOPORT_DIR_OUTPUT);

		ioport_configure_pin(P_DB0, IOPORT_INIT_LOW | IOPORT_DIR_OUTPUT);
		ioport_configure_pin(P_DB1, IOPORT_INIT_LOW | IOPORT_DIR_OUTPUT);
		ioport_configure_pin(P_DB2, IOPORT_INIT_LOW | IOPORT_DIR_OUTPUT);
		ioport_configure_pin(P_DB3, IOPORT_INIT_LOW | IOPORT_DIR_OUTPUT);
		ioport_configure_pin(P_DB4, IOPORT_INIT_LOW | IOPORT_DIR_OUTPUT);
		ioport_configure_pin(P_DB5, IOPORT_INIT_LOW | IOPORT_DIR_OUTPUT);
		ioport_configure_pin(P_DB6, IOPORT_INIT_LOW | IOPORT_DIR_OUTPUT);
		ioport_configure_pin(P_DB7, IOPORT_INIT_LOW | IOPORT_DIR_OUTPUT);
	// Now do the actual LCD initialisations

	// startup delay - make it long to allow time for power to settle
	// (you want wish to remove this line)
	_delay_ms(250);

	// LCD display initialisation by instruction magic sequence
	lcd_set_write_instruction();
	lcd_write_inst(0x38);			// function set
	_delay_ms(100);
	lcd_write_inst(0x08);			// display on/off control
	_delay_ms(100);
	lcd_write_inst(0x01);			// display clear
	_delay_ms(100);
	lcd_write_inst(0x06);			// entry mode set
	_delay_ms(100);
	lcd_write_inst(0x02);
	_delay_ms(100);
	lcd_write_inst(0x0F);
	_delay_ms(100);
	lcd_write_inst(0x0F);
	_delay_ms(100);
	lcd_write_inst(0x39);
	_delay_ms(100);

lcd_write_inst(0x80);

	lcd_write_data('A');
	lcd_write_data('B');
	lcd_write_data('C');
	lcd_write_data('D');
	lcd_write_data('E');


 _delay_ms(100);


}


 void lcd_set_on_off(uint8_t state)
 {
	 lcd_set_write_instruction();
	 if(state==1)
	 {
		 lcd_write_byte(0x0F);
	 }
	 if(state==0)
	 {
		 lcd_write_byte(0x08);
	 }

 }

// This function clears the RS line to write a command
void lcd_set_write_instruction()
 {
	ioport_set_pin_low(LCD_RS);		// set RS line low
	_delay_ms(1);
}


// This function sets the RS line to write data
void lcd_set_write_data()
 {
	ioport_set_pin_high(LCD_RS);		// set RS line high
	_delay_ms(1);

}


// This function writes a byte to the LCD
void lcd_write_byte (char c)
 {
	 ioport_set_pin_low(LCD_RW);
int output[CHAR_BIT];
int i;
for (i = 0; i < CHAR_BIT; ++i)
 {
  output[i] = (c >> i) & 1;
}
//manual approach
if(output[0]==1)
{
	ioport_set_pin_high(P_DB0);
}
else
{
	ioport_set_pin_low(P_DB0);
}
if(output[1]==1)
{
	ioport_set_pin_high(P_DB1);
}
else
{
	ioport_set_pin_low(P_DB1);
}
if(output[2]==1)
{
	ioport_set_pin_high(P_DB2);
}
else
{
	ioport_set_pin_low(P_DB2);
}
if(output[3]==1)
{
	ioport_set_pin_high(P_DB3);
}
else
{
	ioport_set_pin_low(P_DB3);
}
if(output[4]==1)
{
	ioport_set_pin_high(P_DB4);
}
else
{
	ioport_set_pin_low(P_DB4);
}
if(output[5]==1)
{
	ioport_set_pin_high(P_DB5);
}
else
{
	ioport_set_pin_low(P_DB5);
}
if(output[6]==1)
{
	ioport_set_pin_high(P_DB6);
}
else
{
	ioport_set_pin_low(P_DB6);
}
if(output[7]==1)
{
	ioport_set_pin_high(P_DB7);
}
else
{
	ioport_set_pin_low(P_DB7);
}
_delay_us(100);

	//DATA_PORT.OUT = c;			// Place data on Data Port
	ioport_set_pin_high(LCD_E);		// set E line high
	_delay_us(100);
	ioport_set_pin_low(LCD_E);		// set E line low to latch data into LCD
	_delay_ms(1);
}


// This function clears LCD and sets address to beginning of first line
void lcd_clear_and_home()
 {
	lcd_set_write_instruction();
	lcd_write_byte(0x01);
	_delay_ms(2);
	lcd_write_byte(0x02);
	_delay_ms(1);
 }

// This function sets address to beginning of first line
void lcd_home()
{
	lcd_set_write_instruction();
	lcd_write_byte(0x02);
	_delay_ms(1);
}


// This function moves cursor to a given line and position
//  line is either 0 (first line) or 1 (second line)
//  pos is the character position from 0 to 15.
void lcd_goto(uint8_t line, uint8_t pos)
{
	uint8_t position = 0;

	lcd_set_write_instruction();
	switch(line)
	{
		case 0: position = 0;
		break;
		case 1: position = 0x40;
		break;
	}
		lcd_write_byte(0x80 | (position + pos));
}


// This function moves the cursor to 1st character of 1st line
void lcd_line_one() { lcd_goto(0, 0); }


// This function moves the cursor to 1st character if 2nd line
void lcd_line_two() { lcd_goto(1, 0); }


// This function writes a character to the LCD
void lcd_write_data(char c)
{
	//ioport_set_pin_high(P_LED2);
	lcd_set_write_data();
	lcd_write_byte(c);
//	lcd_write_inst(0x14);
	//ioport_set_pin_low(P_LED2);
}

void lcd_write_inst(uint8_t cmd)
{
	lcd_set_write_instruction();
	lcd_write_byte(cmd);
}

// This function writes a string (in SRAM) of given length to the LCD
void lcd_write_string(char *x, uint8_t len )
{
	while (--len > 0)
		lcd_write_data(*x++);
}


// This function writes a null-terminated string (in SRAM) to the LCD
void lcd_write_string_0(char *x)
{
	while (*x)
		lcd_write_data(*x++);
}


// Same as above, but the string is located in program memory,
//  so "lpm" instructions are needed to fetch it, and a \0
//  must be defined at the end of the string to terminate it.
void lcd_write_string_p(const char *s)
{
	char c;

	for (c = pgm_read_byte(s); c; ++s, c = pgm_read_byte(s))
		lcd_write_data(c);
}


 Zitieren
Zitat von leech0ar


Lesezeichen